To get started with adding physical products, firstly visit your Products page and click on the Add new product button. Then select the Physical Product option.

What you do next depends on whether you’re selling one version of the product or several variations (e.g. different sizes or colors).
Add a product with one variation
To add a product with only one variation, after clicking Add Physical Product fill out the details at the top of the page starting with title and price.
You can also add some cover images for your product. This is what will show to the customer on the product page before purchase. You can use audio or video files too by clicking on Embed audio/video and pasting in a link to YouTube, Vimeo, or SoundCloud.
Finally, add your product description. This is the last thing the customer will see before they buy, so use it as an opportunity to really sell the benefits of your product.
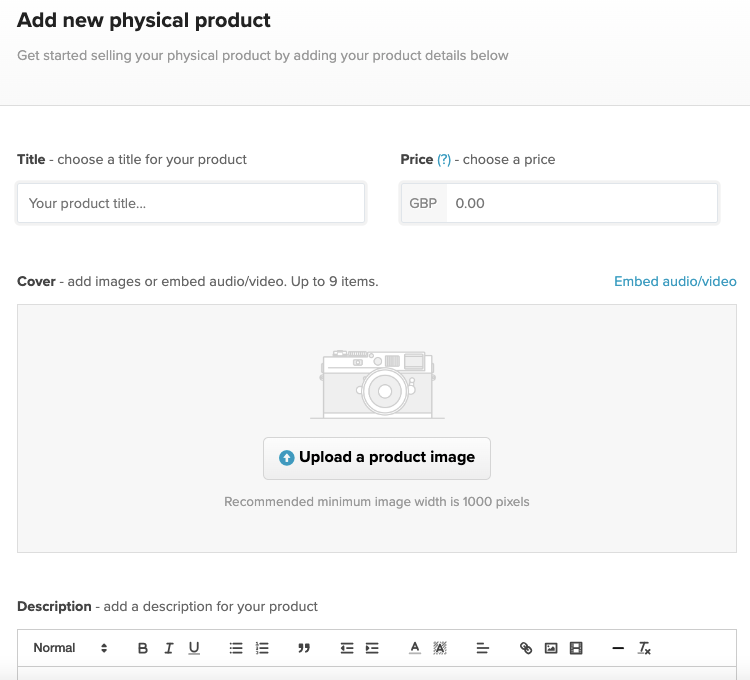
When you’re done with adding your product details, scroll down to the bottom of the screen and hit the button to Add Product. On the next page you can click Show me my product page to see what your customers will see. You can also view this at any time from the Products page of your admin dashboard by selecting View for the product that you’d like to see.
Inventory tracking
Under additional details, you are able to add an SKU for your product. You can set up inventory tracking by selecting the checkbox for Track product inventory. Enter the amount of the product that you currently have and, every time a sale is made, one will be subtracted from this number.
You can also add a product weight if you’d like to. When this product is purchased, the shipping price will be calculated based on the shipping rate for the weight and the customer’s location as added under Settings > Shipping.
Selling product variations
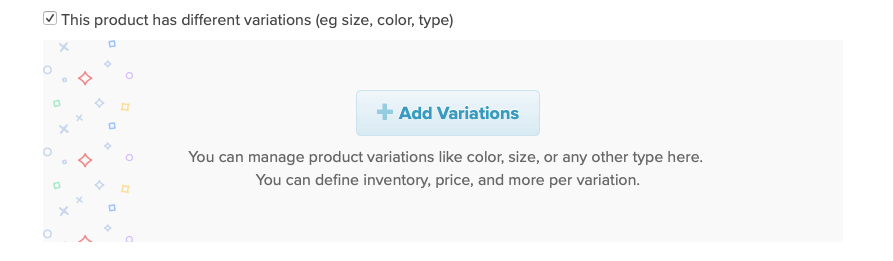
If you are selling several different versions of the same product (e.g. different colors or sizes), then after clicking Add Physical Product only add the title of the product and any cover images or description that you’d like to use (i.e. ignore the Price field). Then, scroll down to the additional details and select the checkbox for This product has different variations.
This will bring up a modal where you can enter the details of the variations. Give the option a name (e.g. size, color), and then choose whether you’d like the option to be displayed on the product page as a bulleted list or a color. Then, type in the choices for the option (e.g. small, medium, large, or green, blue, red). Adding a comma or pressing enter after typing in each choice will add it to the list.
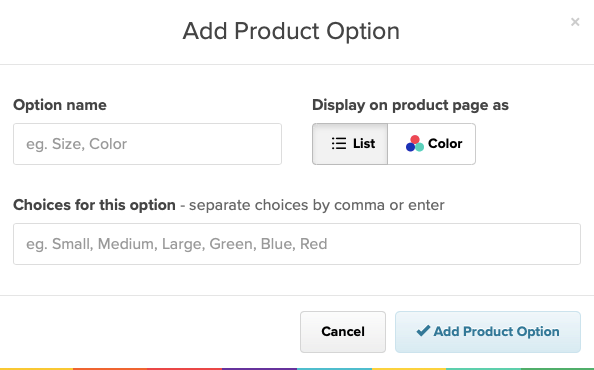
When you’re done, hit Add Product Option.
You’ll now see the option to Manage Combinations.
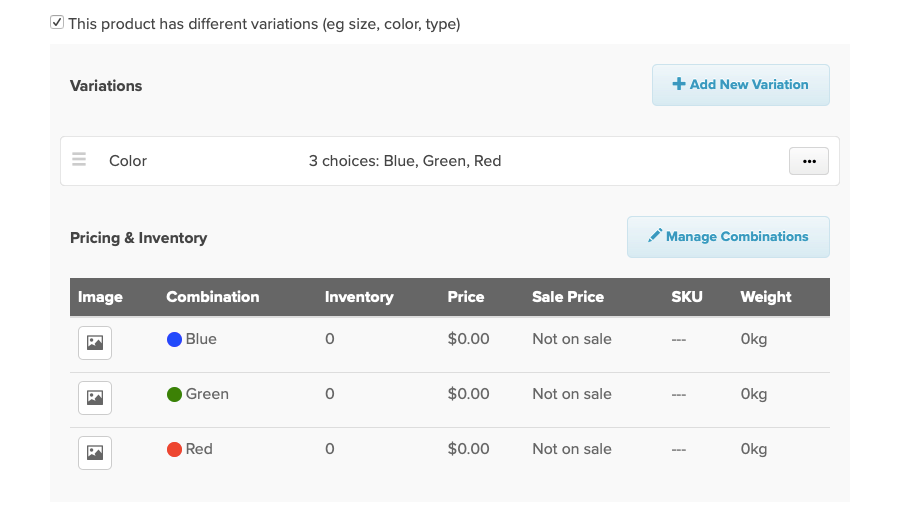
Click on this to add the price of each variation. You can also choose whether to set a sale price, add an SKU, and add the weight for each variation.
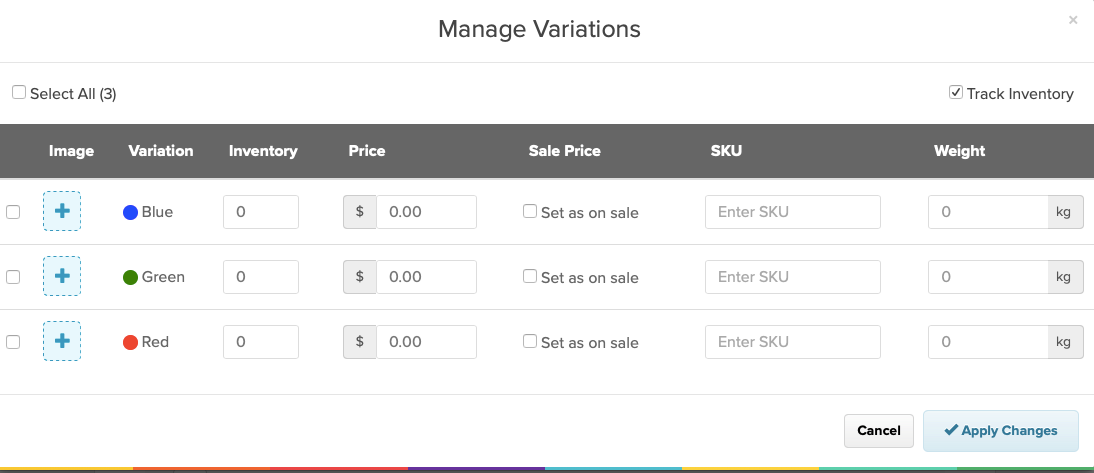
To track inventory for each variation, select the checkbox for Track Inventory at the right of the screen. This will bring up the option to add the number of each item that you currently have. Every time a sale is made, one will be subtracted from the inventory number for that variation.
When you’re done with adding your product details, scroll down to the bottom of the screen and hit the button to Add Product. On the next page you can click Show me my product page to see what your customers will see. You can also view this at any time from the Products page of your admin dashboard by selecting View for the product that you’d like to see.
Product visibility
There are 3 product visibility options available. If you want the product to be shown to everyone on the web then click on the "Visible" option. If you're not ready to show your work to the world, then you can choose on the "Invisible" option - nobody but you will be able to see the product.
There's a middle ground between Visible and Invisible that's called "Unlisted". In this case the product is only shown to people who know the direct link to your product page. The product is not listed anywhere on your store and search engines will not be able to find this product page either. This option can be useful if for example you want to offer a one-time personalized product to a specific customer. Just send the product link to the people who should have access, and no one else will know of it.

Advanced options
Under Advanced options you have a couple of additional options.

Here’s what they mean:
This product is tax exempt – If you select this checkbox, then VAT will not be applied for this product.
Automatically subscribe customers to mailing list – Checking this box will mean that anybody who buys your product will automatically be added to your mailing list. First you will need to make sure that you’ve connected your email marketing program to Payhip.
Before customers are able to purchase your physical products, you will need to set up your shipping details.
Test your checkout flow
To preview what your customers will see when they purchase your product, you can create a coupon code for 100% off the price of the product and use that to run through the checkout flow yourself. More on that here. Please note that any test orders will be displayed on your Customers page and cannot be deleted at this point.