Add Membership Products
If you're looking to create a membership site, we suggest taking a look at this article first to decide whether a membership product or a product bundle would work best for you: Create a Membership Site on Payhip
Creating a Membership
Visit your Products page and click on the Add new product button - you'll see a number of options, click on the Membership box
Next you'll be asked to choose a title for your membership, fill it in then click on the Add Membership button
This will take you to the Posts tab where you can start adding posts for your members
When you click on the Manage Posts button you'll be taken to the membership area your members will see. By default there will be no published posts, but you can start adding posts by clicking on the Create New Post Button
You'll be able to setup 6 different types of posts for your members to access:
Branding
You can customize the membership area to match your own branding. To do this, go back to your manage membership product page, then click on the Settings tab and finally click on the Membership area settings tab.
From here you'll be able to edit the banner image, colors and fonts used on the membership area, as well as a headline text.
Pricing
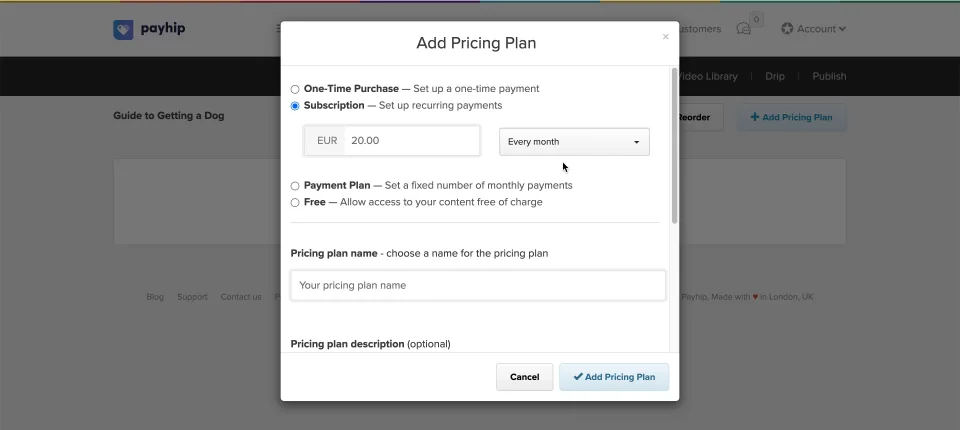
You can add as many pricing plans for your membership as you'd like. Accept one-time payments, recurring subscription payments or specify the number of months you'd like customers to be charged. Alternatively you can create an entirely free pricing plan. To get started with adding pricing plans for your membership, visit your manage membership product page then click on the Pricing tab.
Click for sound
@keyframes VOLUME_SMALL_WAVE_FLASH { 0% { opacity: 0; } 33% { opacity: 1; } 66% { opacity: 1; } 100% { opacity: 0; } } @keyframes VOLUME_LARGE_WAVE_FLASH { 0% { opacity: 0; } 33% { opacity: 1; } 66% { opacity: 1; } 100% { opacity: 0; } } .volume__small-wave { animation: VOLUME_SMALL_WAVE_FLASH 2s infinite; opacity: 0; } .volume__large-wave { animation: VOLUME_LARGE_WAVE_FLASH 2s infinite .3s; opacity: 0; }
@media (prefers-reduced-motion: no-preference) { @keyframes w-control-bar-fade-in { 0% { opacity: 0; transform: translateX(50%) translateY(10px); } 100% { opacity: 1; transform: translateX(50%) translateY(0px); } } }
#wistia_chrome_278 #wistia_grid_284_wrapper .w-css-reset{font-size:14px;} #wistia_chrome_278 #wistia_grid_284_wrapper div.w-css-reset{box-sizing:inherit;box-shadow:none;color:inherit;display:block;float:none;font:inherit;font-family:inherit;font-style:normal;font-weight:normal;font-size:inherit;letter-spacing:0;line-height:inherit;margin:0;max-height:none;max-width:none;min-height:0;min-width:0;padding:0;position:static;text-decoration:none;text-transform:none;text-shadow:none;transition:none;word-wrap:normal;-webkit-tap-highlight-color:rgba(0,0,0,0);-webkit-user-select:none;-webkit-font-smoothing:antialiased} #wistia_chrome_278 #wistia_grid_284_wrapper span.w-css-reset{box-sizing:inherit;box-shadow:none;color:inherit;display:block;float:none;font:inherit;font-family:inherit;font-style:normal;font-weight:normal;font-size:inherit;letter-spacing:0;line-height:inherit;margin:0;max-height:none;max-width:none;min-height:0;min-width:0;padding:0;position:static;text-decoration:none;text-transform:none;text-shadow:none;transition:none;word-wrap:normal;-webkit-tap-highlight-color:rgba(0,0,0,0);-webkit-user-select:none;-webkit-font-smoothing:antialiased} #wistia_chrome_278 #wistia_grid_284_wrapper ul.w-css-reset{box-sizing:inherit;box-shadow:none;color:inherit;display:block;float:none;font:inherit;font-family:inherit;font-style:normal;font-weight:normal;font-size:inherit;letter-spacing:0;line-height:inherit;margin:0;max-height:none;max-width:none;min-height:0;min-width:0;padding:0;position:static;text-decoration:none;text-transform:none;text-shadow:none;transition:none;word-wrap:normal;-webkit-tap-highlight-color:rgba(0,0,0,0);-webkit-user-select:none;-webkit-font-smoothing:antialiased} #wistia_chrome_278 #wistia_grid_284_wrapper li.w-css-reset{box-sizing:inherit;box-shadow:none;color:inherit;display:block;float:none;font:inherit;font-family:inherit;font-style:normal;font-weight:normal;font-size:inherit;letter-spacing:0;line-height:inherit;margin:0;max-height:none;max-width:none;min-height:0;min-width:0;padding:0;position:static;text-decoration:none;text-transform:none;text-shadow:none;transition:none;word-wrap:normal;-webkit-tap-highlight-color:rgba(0,0,0,0);-webkit-user-select:none;-webkit-font-smoothing:antialiased} #wistia_chrome_278 #wistia_grid_284_wrapper label.w-css-reset{box-sizing:inherit;box-shadow:none;color:inherit;display:block;float:none;font:inherit;font-family:inherit;font-style:normal;font-weight:normal;font-size:inherit;letter-spacing:0;line-height:inherit;margin:0;max-height:none;max-width:none;min-height:0;min-width:0;padding:0;position:static;text-decoration:none;text-transform:none;text-shadow:none;transition:none;word-wrap:normal;-webkit-tap-highlight-color:rgba(0,0,0,0);-webkit-user-select:none;-webkit-font-smoothing:antialiased} #wistia_chrome_278 #wistia_grid_284_wrapper fieldset.w-css-reset{box-sizing:inherit;box-shadow:none;color:inherit;display:block;float:none;font:inherit;font-family:inherit;font-style:normal;font-weight:normal;font-size:inherit;letter-spacing:0;line-height:inherit;margin:0;max-height:none;max-width:none;min-height:0;min-width:0;padding:0;position:static;text-decoration:none;text-transform:none;text-shadow:none;transition:none;word-wrap:normal;-webkit-tap-highlight-color:rgba(0,0,0,0);-webkit-user-select:none;-webkit-font-smoothing:antialiased} #wistia_chrome_278 #wistia_grid_284_wrapper button.w-css-reset{box-sizing:inherit;box-shadow:none;color:inherit;display:block;float:none;font:inherit;font-family:inherit;font-style:normal;font-weight:normal;font-size:inherit;letter-spacing:0;line-height:inherit;margin:0;max-height:none;max-width:none;min-height:0;min-width:0;padding:0;position:static;text-decoration:none;text-transform:none;text-shadow:none;transition:none;word-wrap:normal;-webkit-tap-highlight-color:rgba(0,0,0,0);-webkit-user-select:none;-webkit-font-smoothing:antialiased} #wistia_chrome_278 #wistia_grid_284_wrapper img.w-css-reset{box-sizing:inherit;box-shadow:none;color:inherit;display:block;float:none;font:inherit;font-family:inherit;font-style:normal;font-weight:normal;font-size:inherit;letter-spacing:0;line-height:inherit;margin:0;max-height:none;max-width:none;min-height:0;min-width:0;padding:0;position:static;text-decoration:none;text-transform:none;text-shadow:none;transition:none;word-wrap:normal;-webkit-tap-highlight-color:rgba(0,0,0,0);-webkit-user-select:none;-webkit-font-smoothing:antialiased} #wistia_chrome_278 #wistia_grid_284_wrapper a.w-css-reset{box-sizing:inherit;box-shadow:none;color:inherit;display:block;float:none;font:inherit;font-family:inherit;font-style:normal;font-weight:normal;font-size:inherit;letter-spacing:0;line-height:inherit;margin:0;max-height:none;max-width:none;min-height:0;min-width:0;padding:0;position:static;text-decoration:none;text-transform:none;text-shadow:none;transition:none;word-wrap:normal;-webkit-tap-highlight-color:rgba(0,0,0,0);-webkit-user-select:none;-webkit-font-smoothing:antialiased} #wistia_chrome_278 #wistia_grid_284_wrapper svg.w-css-reset{box-sizing:inherit;box-shadow:none;color:inherit;display:block;float:none;font:inherit;font-family:inherit;font-style:normal;font-weight:normal;font-size:inherit;letter-spacing:0;line-height:inherit;margin:0;max-height:none;max-width:none;min-height:0;min-width:0;padding:0;position:static;text-decoration:none;text-transform:none;text-shadow:none;transition:none;word-wrap:normal;-webkit-tap-highlight-color:rgba(0,0,0,0);-webkit-user-select:none;-webkit-font-smoothing:antialiased} #wistia_chrome_278 #wistia_grid_284_wrapper p.w-css-reset{box-sizing:inherit;box-shadow:none;color:inherit;display:block;float:none;font:inherit;font-family:inherit;font-style:normal;font-weight:normal;font-size:inherit;letter-spacing:0;line-height:inherit;margin:0;max-height:none;max-width:none;min-height:0;min-width:0;padding:0;position:static;text-decoration:none;text-transform:none;text-shadow:none;transition:none;word-wrap:normal;-webkit-tap-highlight-color:rgba(0,0,0,0);-webkit-user-select:none;-webkit-font-smoothing:antialiased} #wistia_chrome_278 #wistia_grid_284_wrapper a.w-css-reset{border:0;} #wistia_chrome_278 #wistia_grid_284_wrapper h1.w-css-reset{box-sizing:inherit;box-shadow:none;color:inherit;display:block;float:none;font:inherit;font-family:inherit;font-style:normal;font-weight:normal;font-size:2em;letter-spacing:0;line-height:inherit;margin:0;max-height:none;max-width:none;min-height:0;min-width:0;padding:0;position:static;text-decoration:none;text-transform:none;text-shadow:none;transition:none;word-wrap:normal;-webkit-tap-highlight-color:rgba(0,0,0,0);-webkit-user-select:none;-webkit-font-smoothing:antialiased} #wistia_chrome_278 #wistia_grid_284_wrapper h2.w-css-reset{box-sizing:inherit;box-shadow:none;color:inherit;display:block;float:none;font:inherit;font-family:inherit;font-style:normal;font-weight:normal;font-size:1.5em;letter-spacing:0;line-height:inherit;margin:0;max-height:none;max-width:none;min-height:0;min-width:0;padding:0;position:static;text-decoration:none;text-transform:none;text-shadow:none;transition:none;word-wrap:normal;-webkit-tap-highlight-color:rgba(0,0,0,0);-webkit-user-select:none;-webkit-font-smoothing:antialiased} #wistia_chrome_278 #wistia_grid_284_wrapper h3.w-css-reset{box-sizing:inherit;box-shadow:none;color:inherit;display:block;float:none;font:inherit;font-family:inherit;font-style:normal;font-weight:normal;font-size:1.17em;letter-spacing:0;line-height:inherit;margin:0;max-height:none;max-width:none;min-height:0;min-width:0;padding:0;position:static;text-decoration:none;text-transform:none;text-shadow:none;transition:none;word-wrap:normal;-webkit-tap-highlight-color:rgba(0,0,0,0);-webkit-user-select:none;-webkit-font-smoothing:antialiased} #wistia_chrome_278 #wistia_grid_284_wrapper p.w-css-reset{margin:1.4em 0;} #wistia_chrome_278 #wistia_grid_284_wrapper a.w-css-reset{display:inline;} #wistia_chrome_278 #wistia_grid_284_wrapper span.w-css-reset{display:inline;} #wistia_chrome_278 #wistia_grid_284_wrapper svg.w-css-reset{display:inline;} #wistia_chrome_278 #wistia_grid_284_wrapper ul.w-css-reset{box-sizing:inherit;box-shadow:none;color:inherit;display:block;float:none;font:inherit;font-family:inherit;font-style:normal;font-weight:normal;font-size:inherit;letter-spacing:0;line-height:inherit;margin:0;max-height:none;max-width:none;min-height:0;min-width:0;padding:0;position:static;text-decoration:none;text-transform:none;text-shadow:none;transition:none;word-wrap:normal;-webkit-tap-highlight-color:rgba(0,0,0,0);-webkit-user-select:none;-webkit-font-smoothing:antialiased;list-style-type:none} #wistia_chrome_278 #wistia_grid_284_wrapper ol.w-css-reset{box-sizing:inherit;box-shadow:none;color:inherit;display:block;float:none;font:inherit;font-family:inherit;font-style:normal;font-weight:normal;font-size:inherit;letter-spacing:0;line-height:inherit;margin:0;max-height:none;max-width:none;min-height:0;min-width:0;padding:0;position:static;text-decoration:none;text-transform:none;text-shadow:none;transition:none;word-wrap:normal;-webkit-tap-highlight-color:rgba(0,0,0,0);-webkit-user-select:none;-webkit-font-smoothing:antialiased;list-style-type:none} #wistia_chrome_278 #wistia_grid_284_wrapper li.w-css-reset{box-sizing:inherit;box-shadow:none;color:inherit;display:block;float:none;font:inherit;font-family:inherit;font-style:normal;font-weight:normal;font-size:inherit;letter-spacing:0;line-height:inherit;margin:0;max-height:none;max-width:none;min-height:0;min-width:0;padding:0;position:static;text-decoration:none;text-transform:none;text-shadow:none;transition:none;word-wrap:normal;-webkit-tap-highlight-color:rgba(0,0,0,0);-webkit-user-select:none;-webkit-font-smoothing:antialiased;list-style-type:none} #wistia_chrome_278 #wistia_grid_284_wrapper ul:before.w-css-reset{display:none} #wistia_chrome_278 #wistia_grid_284_wrapper ol:before.w-css-reset{display:none} #wistia_chrome_278 #wistia_grid_284_wrapper li:before.w-css-reset{display:none} #wistia_chrome_278 #wistia_grid_284_wrapper ul:after.w-css-reset{display:none} #wistia_chrome_278 #wistia_grid_284_wrapper ol:after.w-css-reset{display:none} #wistia_chrome_278 #wistia_grid_284_wrapper li:after.w-css-reset{display:none} #wistia_chrome_278 #wistia_grid_284_wrapper label.w-css-reset{background-attachment:scroll;background-color:transparent;background-image:none;background-position:0 0;background-repeat:no-repeat;background-size:100% 100%;float:none;outline:none} #wistia_chrome_278 #wistia_grid_284_wrapper button.w-css-reset{background-attachment:scroll;background-color:transparent;background-image:none;background-position:0 0;background-repeat:no-repeat;background-size:100% 100%;border:0;border-radius:0;outline:none;position:static} #wistia_chrome_278 #wistia_grid_284_wrapper img.w-css-reset{border:0;display:inline-block;vertical-align:top;border-radius:0;outline:none;position:static} #wistia_chrome_278 #wistia_grid_284_wrapper .w-css-reset button::-moz-focus-inner{border: 0;} #wistia_chrome_278 #wistia_grid_284_wrapper .w-css-reset-tree {font-size:14px;} #wistia_chrome_278 #wistia_grid_284_wrapper .w-css-reset-tree div{box-sizing:inherit;box-shadow:none;color:inherit;display:block;float:none;font:inherit;font-family:inherit;font-style:normal;font-weight:normal;font-size:inherit;letter-spacing:0;line-height:inherit;margin:0;max-height:none;max-width:none;min-height:0;min-width:0;padding:0;position:static;text-decoration:none;text-transform:none;text-shadow:none;transition:none;word-wrap:normal;-webkit-tap-highlight-color:rgba(0,0,0,0);-webkit-user-select:none;-webkit-font-smoothing:antialiased} #wistia_chrome_278 #wistia_grid_284_wrapper .w-css-reset-tree span{box-sizing:inherit;box-shadow:none;color:inherit;display:block;float:none;font:inherit;font-family:inherit;font-style:normal;font-weight:normal;font-size:inherit;letter-spacing:0;line-height:inherit;margin:0;max-height:none;max-width:none;min-height:0;min-width:0;padding:0;position:static;text-decoration:none;text-transform:none;text-shadow:none;transition:none;word-wrap:normal;-webkit-tap-highlight-color:rgba(0,0,0,0);-webkit-user-select:none;-webkit-font-smoothing:antialiased} #wistia_chrome_278 #wistia_grid_284_wrapper .w-css-reset-tree ul{box-sizing:inherit;box-shadow:none;color:inherit;display:block;float:none;font:inherit;font-family:inherit;font-style:normal;font-weight:normal;font-size:inherit;letter-spacing:0;line-height:inherit;margin:0;max-height:none;max-width:none;min-height:0;min-width:0;padding:0;position:static;text-decoration:none;text-transform:none;text-shadow:none;transition:none;word-wrap:normal;-webkit-tap-highlight-color:rgba(0,0,0,0);-webkit-user-select:none;-webkit-font-smoothing:antialiased} #wistia_chrome_278 #wistia_grid_284_wrapper .w-css-reset-tree li{box-sizing:inherit;box-shadow:none;color:inherit;display:block;float:none;font:inherit;font-family:inherit;font-style:normal;font-weight:normal;font-size:inherit;letter-spacing:0;line-height:inherit;margin:0;max-height:none;max-width:none;min-height:0;min-width:0;padding:0;position:static;text-decoration:none;text-transform:none;text-shadow:none;transition:none;word-wrap:normal;-webkit-tap-highlight-color:rgba(0,0,0,0);-webkit-user-select:none;-webkit-font-smoothing:antialiased} #wistia_chrome_278 #wistia_grid_284_wrapper .w-css-reset-tree label{box-sizing:inherit;box-shadow:none;color:inherit;display:block;float:none;font:inherit;font-family:inherit;font-style:normal;font-weight:normal;font-size:inherit;letter-spacing:0;line-height:inherit;margin:0;max-height:none;max-width:none;min-height:0;min-width:0;padding:0;position:static;text-decoration:none;text-transform:none;text-shadow:none;transition:none;word-wrap:normal;-webkit-tap-highlight-color:rgba(0,0,0,0);-webkit-user-select:none;-webkit-font-smoothing:antialiased} #wistia_chrome_278 #wistia_grid_284_wrapper .w-css-reset-tree fieldset{box-sizing:inherit;box-shadow:none;color:inherit;display:block;float:none;font:inherit;font-family:inherit;font-style:normal;font-weight:normal;font-size:inherit;letter-spacing:0;line-height:inherit;margin:0;max-height:none;max-width:none;min-height:0;min-width:0;padding:0;position:static;text-decoration:none;text-transform:none;text-shadow:none;transition:none;word-wrap:normal;-webkit-tap-highlight-color:rgba(0,0,0,0);-webkit-user-select:none;-webkit-font-smoothing:antialiased} #wistia_chrome_278 #wistia_grid_284_wrapper .w-css-reset-tree button{box-sizing:inherit;box-shadow:none;color:inherit;display:block;float:none;font:inherit;font-family:inherit;font-style:normal;font-weight:normal;font-size:inherit;letter-spacing:0;line-height:inherit;margin:0;max-height:none;max-width:none;min-height:0;min-width:0;padding:0;position:static;text-decoration:none;text-transform:none;text-shadow:none;transition:none;word-wrap:normal;-webkit-tap-highlight-color:rgba(0,0,0,0);-webkit-user-select:none;-webkit-font-smoothing:antialiased} #wistia_chrome_278 #wistia_grid_284_wrapper .w-css-reset-tree img{box-sizing:inherit;box-shadow:none;color:inherit;display:block;float:none;font:inherit;font-family:inherit;font-style:normal;font-weight:normal;font-size:inherit;letter-spacing:0;line-height:inherit;margin:0;max-height:none;max-width:none;min-height:0;min-width:0;padding:0;position:static;text-decoration:none;text-transform:none;text-shadow:none;transition:none;word-wrap:normal;-webkit-tap-highlight-color:rgba(0,0,0,0);-webkit-user-select:none;-webkit-font-smoothing:antialiased} #wistia_chrome_278 #wistia_grid_284_wrapper .w-css-reset-tree a{box-sizing:inherit;box-shadow:none;color:inherit;display:block;float:none;font:inherit;font-family:inherit;font-style:normal;font-weight:normal;font-size:inherit;letter-spacing:0;line-height:inherit;margin:0;max-height:none;max-width:none;min-height:0;min-width:0;padding:0;position:static;text-decoration:none;text-transform:none;text-shadow:none;transition:none;word-wrap:normal;-webkit-tap-highlight-color:rgba(0,0,0,0);-webkit-user-select:none;-webkit-font-smoothing:antialiased} #wistia_chrome_278 #wistia_grid_284_wrapper .w-css-reset-tree svg{box-sizing:inherit;box-shadow:none;color:inherit;display:block;float:none;font:inherit;font-family:inherit;font-style:normal;font-weight:normal;font-size:inherit;letter-spacing:0;line-height:inherit;margin:0;max-height:none;max-width:none;min-height:0;min-width:0;padding:0;position:static;text-decoration:none;text-transform:none;text-shadow:none;transition:none;word-wrap:normal;-webkit-tap-highlight-color:rgba(0,0,0,0);-webkit-user-select:none;-webkit-font-smoothing:antialiased} #wistia_chrome_278 #wistia_grid_284_wrapper .w-css-reset-tree p{box-sizing:inherit;box-shadow:none;color:inherit;display:block;float:none;font:inherit;font-family:inherit;font-style:normal;font-weight:normal;font-size:inherit;letter-spacing:0;line-height:inherit;margin:0;max-height:none;max-width:none;min-height:0;min-width:0;padding:0;position:static;text-decoration:none;text-transform:none;text-shadow:none;transition:none;word-wrap:normal;-webkit-tap-highlight-color:rgba(0,0,0,0);-webkit-user-select:none;-webkit-font-smoothing:antialiased} #wistia_chrome_278 #wistia_grid_284_wrapper .w-css-reset-tree a{border:0;} #wistia_chrome_278 #wistia_grid_284_wrapper .w-css-reset-tree h1{box-sizing:inherit;box-shadow:none;color:inherit;display:block;float:none;font:inherit;font-family:inherit;font-style:normal;font-weight:normal;font-size:2em;letter-spacing:0;line-height:inherit;margin:0;max-height:none;max-width:none;min-height:0;min-width:0;padding:0;position:static;text-decoration:none;text-transform:none;text-shadow:none;transition:none;word-wrap:normal;-webkit-tap-highlight-color:rgba(0,0,0,0);-webkit-user-select:none;-webkit-font-smoothing:antialiased} #wistia_chrome_278 #wistia_grid_284_wrapper .w-css-reset-tree h2{box-sizing:inherit;box-shadow:none;color:inherit;display:block;float:none;font:inherit;font-family:inherit;font-style:normal;font-weight:normal;font-size:1.5em;letter-spacing:0;line-height:inherit;margin:0;max-height:none;max-width:none;min-height:0;min-width:0;padding:0;position:static;text-decoration:none;text-transform:none;text-shadow:none;transition:none;word-wrap:normal;-webkit-tap-highlight-color:rgba(0,0,0,0);-webkit-user-select:none;-webkit-font-smoothing:antialiased} #wistia_chrome_278 #wistia_grid_284_wrapper .w-css-reset-tree h3{box-sizing:inherit;box-shadow:none;color:inherit;display:block;float:none;font:inherit;font-family:inherit;font-style:normal;font-weight:normal;font-size:1.17em;letter-spacing:0;line-height:inherit;margin:0;max-height:none;max-width:none;min-height:0;min-width:0;padding:0;position:static;text-decoration:none;text-transform:none;text-shadow:none;transition:none;word-wrap:normal;-webkit-tap-highlight-color:rgba(0,0,0,0);-webkit-user-select:none;-webkit-font-smoothing:antialiased} #wistia_chrome_278 #wistia_grid_284_wrapper .w-css-reset-tree p{margin:1.4em 0;} #wistia_chrome_278 #wistia_grid_284_wrapper .w-css-reset-tree a{display:inline;} #wistia_chrome_278 #wistia_grid_284_wrapper .w-css-reset-tree span{display:inline;} #wistia_chrome_278 #wistia_grid_284_wrapper .w-css-reset-tree svg{display:inline;} #wistia_chrome_278 #wistia_grid_284_wrapper .w-css-reset-tree ul{box-sizing:inherit;box-shadow:none;color:inherit;display:block;float:none;font:inherit;font-family:inherit;font-style:normal;font-weight:normal;font-size:inherit;letter-spacing:0;line-height:inherit;margin:0;max-height:none;max-width:none;min-height:0;min-width:0;padding:0;position:static;text-decoration:none;text-transform:none;text-shadow:none;transition:none;word-wrap:normal;-webkit-tap-highlight-color:rgba(0,0,0,0);-webkit-user-select:none;-webkit-font-smoothing:antialiased;list-style-type:none} #wistia_chrome_278 #wistia_grid_284_wrapper .w-css-reset-tree ol{box-sizing:inherit;box-shadow:none;color:inherit;display:block;float:none;font:inherit;font-family:inherit;font-style:normal;font-weight:normal;font-size:inherit;letter-spacing:0;line-height:inherit;margin:0;max-height:none;max-width:none;min-height:0;min-width:0;padding:0;position:static;text-decoration:none;text-transform:none;text-shadow:none;transition:none;word-wrap:normal;-webkit-tap-highlight-color:rgba(0,0,0,0);-webkit-user-select:none;-webkit-font-smoothing:antialiased;list-style-type:none} #wistia_chrome_278 #wistia_grid_284_wrapper .w-css-reset-tree li{box-sizing:inherit;box-shadow:none;color:inherit;display:block;float:none;font:inherit;font-family:inherit;font-style:normal;font-weight:normal;font-size:inherit;letter-spacing:0;line-height:inherit;margin:0;max-height:none;max-width:none;min-height:0;min-width:0;padding:0;position:static;text-decoration:none;text-transform:none;text-shadow:none;transition:none;word-wrap:normal;-webkit-tap-highlight-color:rgba(0,0,0,0);-webkit-user-select:none;-webkit-font-smoothing:antialiased;list-style-type:none} #wistia_chrome_278 #wistia_grid_284_wrapper .w-css-reset-tree ul:before{display:none} #wistia_chrome_278 #wistia_grid_284_wrapper .w-css-reset-tree ol:before{display:none} #wistia_chrome_278 #wistia_grid_284_wrapper .w-css-reset-tree li:before{display:none} #wistia_chrome_278 #wistia_grid_284_wrapper .w-css-reset-tree ul:after{display:none} #wistia_chrome_278 #wistia_grid_284_wrapper .w-css-reset-tree ol:after{display:none} #wistia_chrome_278 #wistia_grid_284_wrapper .w-css-reset-tree li:after{display:none} #wistia_chrome_278 #wistia_grid_284_wrapper .w-css-reset-tree label{background-attachment:scroll;background-color:transparent;background-image:none;background-position:0 0;background-repeat:no-repeat;background-size:100% 100%;float:none;outline:none} #wistia_chrome_278 #wistia_grid_284_wrapper .w-css-reset-tree button{background-attachment:scroll;background-color:transparent;background-image:none;background-position:0 0;background-repeat:no-repeat;background-size:100% 100%;border:0;border-radius:0;outline:none;position:static} #wistia_chrome_278 #wistia_grid_284_wrapper .w-css-reset-tree img{border:0;display:inline-block;vertical-align:top;border-radius:0;outline:none;position:static} #wistia_chrome_278 #wistia_grid_284_wrapper .w-css-reset-tree button::-moz-focus-inner{border: 0;} #wistia_chrome_278 #wistia_grid_284_wrapper .w-css-reset-max-width-none-important{max-width:none!important} #wistia_chrome_278 #wistia_grid_284_wrapper .w-css-reset-button-important{border-radius:0!important;color:#fff!important;}
#wistia_grid_284_wrapper{-moz-box-sizing:content-box;-webkit-box-sizing:content-box;box-sizing:content-box;font-family:Arial,sans-serif;font-size:14px;height:100%;position:relative;text-align:left;width:100%;} #wistia_grid_284_wrapper *{-moz-box-sizing:content-box;-webkit-box-sizing:content-box;box-sizing:content-box;} #wistia_grid_284_above{position:relative;} #wistia_grid_284_main{display:block;height:100%;position:relative;} #wistia_grid_284_behind{height:100%;left:0;position:absolute;top:0;width:100%;} #wistia_grid_284_center{height:100%;overflow:hidden;position:relative;width:100%;} #wistia_grid_284_front{display:none;height:100%;left:0;position:absolute;top:0;width:100%;} #wistia_grid_284_top_inside{position:absolute;left:0;top:0;width:100%;} #wistia_grid_284_top{width:100%;position:absolute;bottom:0;left:0;} #wistia_grid_284_bottom_inside{position:absolute;left:0;bottom:0;width:100%;} #wistia_grid_284_bottom{width:100%;position:absolute;top:0;left:0;} #wistia_grid_284_left_inside{height:100%;position:absolute;left:0;top:0;} #wistia_grid_284_left{height:100%;position:absolute;right:0;top:0;} #wistia_grid_284_right_inside{height:100%;right:0;position:absolute;top:0;} #wistia_grid_284_right{height:100%;left:0;position:absolute;top:0;} #wistia_grid_284_below{position:relative;}
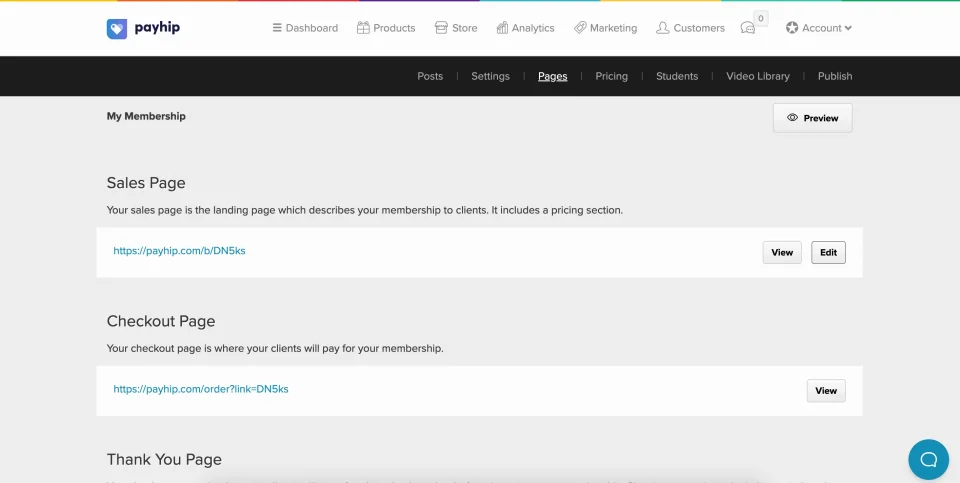
Editing Sales Page
Even though you've added the membership product now, you still need to customize the sales page - this page is the face of your membership and so needs to explain to people why they should enroll and what they can expect.
To edit your membership sales page, please visit your manage membership product page then click on the Pages tab. Then under the Sales Page section click on the Edit button.
Click for sound
@keyframes VOLUME_SMALL_WAVE_FLASH { 0% { opacity: 0; } 33% { opacity: 1; } 66% { opacity: 1; } 100% { opacity: 0; } } @keyframes VOLUME_LARGE_WAVE_FLASH { 0% { opacity: 0; } 33% { opacity: 1; } 66% { opacity: 1; } 100% { opacity: 0; } } .volume__small-wave { animation: VOLUME_SMALL_WAVE_FLASH 2s infinite; opacity: 0; } .volume__large-wave { animation: VOLUME_LARGE_WAVE_FLASH 2s infinite .3s; opacity: 0; }
@media (prefers-reduced-motion: no-preference) { @keyframes w-control-bar-fade-in { 0% { opacity: 0; transform: translateX(50%) translateY(10px); } 100% { opacity: 1; transform: translateX(50%) translateY(0px); } } }
#wistia_chrome_302 #wistia_grid_308_wrapper .w-css-reset{font-size:14px;} #wistia_chrome_302 #wistia_grid_308_wrapper div.w-css-reset{box-sizing:inherit;box-shadow:none;color:inherit;display:block;float:none;font:inherit;font-family:inherit;font-style:normal;font-weight:normal;font-size:inherit;letter-spacing:0;line-height:inherit;margin:0;max-height:none;max-width:none;min-height:0;min-width:0;padding:0;position:static;text-decoration:none;text-transform:none;text-shadow:none;transition:none;word-wrap:normal;-webkit-tap-highlight-color:rgba(0,0,0,0);-webkit-user-select:none;-webkit-font-smoothing:antialiased} #wistia_chrome_302 #wistia_grid_308_wrapper span.w-css-reset{box-sizing:inherit;box-shadow:none;color:inherit;display:block;float:none;font:inherit;font-family:inherit;font-style:normal;font-weight:normal;font-size:inherit;letter-spacing:0;line-height:inherit;margin:0;max-height:none;max-width:none;min-height:0;min-width:0;padding:0;position:static;text-decoration:none;text-transform:none;text-shadow:none;transition:none;word-wrap:normal;-webkit-tap-highlight-color:rgba(0,0,0,0);-webkit-user-select:none;-webkit-font-smoothing:antialiased} #wistia_chrome_302 #wistia_grid_308_wrapper ul.w-css-reset{box-sizing:inherit;box-shadow:none;color:inherit;display:block;float:none;font:inherit;font-family:inherit;font-style:normal;font-weight:normal;font-size:inherit;letter-spacing:0;line-height:inherit;margin:0;max-height:none;max-width:none;min-height:0;min-width:0;padding:0;position:static;text-decoration:none;text-transform:none;text-shadow:none;transition:none;word-wrap:normal;-webkit-tap-highlight-color:rgba(0,0,0,0);-webkit-user-select:none;-webkit-font-smoothing:antialiased} #wistia_chrome_302 #wistia_grid_308_wrapper li.w-css-reset{box-sizing:inherit;box-shadow:none;color:inherit;display:block;float:none;font:inherit;font-family:inherit;font-style:normal;font-weight:normal;font-size:inherit;letter-spacing:0;line-height:inherit;margin:0;max-height:none;max-width:none;min-height:0;min-width:0;padding:0;position:static;text-decoration:none;text-transform:none;text-shadow:none;transition:none;word-wrap:normal;-webkit-tap-highlight-color:rgba(0,0,0,0);-webkit-user-select:none;-webkit-font-smoothing:antialiased} #wistia_chrome_302 #wistia_grid_308_wrapper label.w-css-reset{box-sizing:inherit;box-shadow:none;color:inherit;display:block;float:none;font:inherit;font-family:inherit;font-style:normal;font-weight:normal;font-size:inherit;letter-spacing:0;line-height:inherit;margin:0;max-height:none;max-width:none;min-height:0;min-width:0;padding:0;position:static;text-decoration:none;text-transform:none;text-shadow:none;transition:none;word-wrap:normal;-webkit-tap-highlight-color:rgba(0,0,0,0);-webkit-user-select:none;-webkit-font-smoothing:antialiased} #wistia_chrome_302 #wistia_grid_308_wrapper fieldset.w-css-reset{box-sizing:inherit;box-shadow:none;color:inherit;display:block;float:none;font:inherit;font-family:inherit;font-style:normal;font-weight:normal;font-size:inherit;letter-spacing:0;line-height:inherit;margin:0;max-height:none;max-width:none;min-height:0;min-width:0;padding:0;position:static;text-decoration:none;text-transform:none;text-shadow:none;transition:none;word-wrap:normal;-webkit-tap-highlight-color:rgba(0,0,0,0);-webkit-user-select:none;-webkit-font-smoothing:antialiased} #wistia_chrome_302 #wistia_grid_308_wrapper button.w-css-reset{box-sizing:inherit;box-shadow:none;color:inherit;display:block;float:none;font:inherit;font-family:inherit;font-style:normal;font-weight:normal;font-size:inherit;letter-spacing:0;line-height:inherit;margin:0;max-height:none;max-width:none;min-height:0;min-width:0;padding:0;position:static;text-decoration:none;text-transform:none;text-shadow:none;transition:none;word-wrap:normal;-webkit-tap-highlight-color:rgba(0,0,0,0);-webkit-user-select:none;-webkit-font-smoothing:antialiased} #wistia_chrome_302 #wistia_grid_308_wrapper img.w-css-reset{box-sizing:inherit;box-shadow:none;color:inherit;display:block;float:none;font:inherit;font-family:inherit;font-style:normal;font-weight:normal;font-size:inherit;letter-spacing:0;line-height:inherit;margin:0;max-height:none;max-width:none;min-height:0;min-width:0;padding:0;position:static;text-decoration:none;text-transform:none;text-shadow:none;transition:none;word-wrap:normal;-webkit-tap-highlight-color:rgba(0,0,0,0);-webkit-user-select:none;-webkit-font-smoothing:antialiased} #wistia_chrome_302 #wistia_grid_308_wrapper a.w-css-reset{box-sizing:inherit;box-shadow:none;color:inherit;display:block;float:none;font:inherit;font-family:inherit;font-style:normal;font-weight:normal;font-size:inherit;letter-spacing:0;line-height:inherit;margin:0;max-height:none;max-width:none;min-height:0;min-width:0;padding:0;position:static;text-decoration:none;text-transform:none;text-shadow:none;transition:none;word-wrap:normal;-webkit-tap-highlight-color:rgba(0,0,0,0);-webkit-user-select:none;-webkit-font-smoothing:antialiased} #wistia_chrome_302 #wistia_grid_308_wrapper svg.w-css-reset{box-sizing:inherit;box-shadow:none;color:inherit;display:block;float:none;font:inherit;font-family:inherit;font-style:normal;font-weight:normal;font-size:inherit;letter-spacing:0;line-height:inherit;margin:0;max-height:none;max-width:none;min-height:0;min-width:0;padding:0;position:static;text-decoration:none;text-transform:none;text-shadow:none;transition:none;word-wrap:normal;-webkit-tap-highlight-color:rgba(0,0,0,0);-webkit-user-select:none;-webkit-font-smoothing:antialiased} #wistia_chrome_302 #wistia_grid_308_wrapper p.w-css-reset{box-sizing:inherit;box-shadow:none;color:inherit;display:block;float:none;font:inherit;font-family:inherit;font-style:normal;font-weight:normal;font-size:inherit;letter-spacing:0;line-height:inherit;margin:0;max-height:none;max-width:none;min-height:0;min-width:0;padding:0;position:static;text-decoration:none;text-transform:none;text-shadow:none;transition:none;word-wrap:normal;-webkit-tap-highlight-color:rgba(0,0,0,0);-webkit-user-select:none;-webkit-font-smoothing:antialiased} #wistia_chrome_302 #wistia_grid_308_wrapper a.w-css-reset{border:0;} #wistia_chrome_302 #wistia_grid_308_wrapper h1.w-css-reset{box-sizing:inherit;box-shadow:none;color:inherit;display:block;float:none;font:inherit;font-family:inherit;font-style:normal;font-weight:normal;font-size:2em;letter-spacing:0;line-height:inherit;margin:0;max-height:none;max-width:none;min-height:0;min-width:0;padding:0;position:static;text-decoration:none;text-transform:none;text-shadow:none;transition:none;word-wrap:normal;-webkit-tap-highlight-color:rgba(0,0,0,0);-webkit-user-select:none;-webkit-font-smoothing:antialiased} #wistia_chrome_302 #wistia_grid_308_wrapper h2.w-css-reset{box-sizing:inherit;box-shadow:none;color:inherit;display:block;float:none;font:inherit;font-family:inherit;font-style:normal;font-weight:normal;font-size:1.5em;letter-spacing:0;line-height:inherit;margin:0;max-height:none;max-width:none;min-height:0;min-width:0;padding:0;position:static;text-decoration:none;text-transform:none;text-shadow:none;transition:none;word-wrap:normal;-webkit-tap-highlight-color:rgba(0,0,0,0);-webkit-user-select:none;-webkit-font-smoothing:antialiased} #wistia_chrome_302 #wistia_grid_308_wrapper h3.w-css-reset{box-sizing:inherit;box-shadow:none;color:inherit;display:block;float:none;font:inherit;font-family:inherit;font-style:normal;font-weight:normal;font-size:1.17em;letter-spacing:0;line-height:inherit;margin:0;max-height:none;max-width:none;min-height:0;min-width:0;padding:0;position:static;text-decoration:none;text-transform:none;text-shadow:none;transition:none;word-wrap:normal;-webkit-tap-highlight-color:rgba(0,0,0,0);-webkit-user-select:none;-webkit-font-smoothing:antialiased} #wistia_chrome_302 #wistia_grid_308_wrapper p.w-css-reset{margin:1.4em 0;} #wistia_chrome_302 #wistia_grid_308_wrapper a.w-css-reset{display:inline;} #wistia_chrome_302 #wistia_grid_308_wrapper span.w-css-reset{display:inline;} #wistia_chrome_302 #wistia_grid_308_wrapper svg.w-css-reset{display:inline;} #wistia_chrome_302 #wistia_grid_308_wrapper ul.w-css-reset{box-sizing:inherit;box-shadow:none;color:inherit;display:block;float:none;font:inherit;font-family:inherit;font-style:normal;font-weight:normal;font-size:inherit;letter-spacing:0;line-height:inherit;margin:0;max-height:none;max-width:none;min-height:0;min-width:0;padding:0;position:static;text-decoration:none;text-transform:none;text-shadow:none;transition:none;word-wrap:normal;-webkit-tap-highlight-color:rgba(0,0,0,0);-webkit-user-select:none;-webkit-font-smoothing:antialiased;list-style-type:none} #wistia_chrome_302 #wistia_grid_308_wrapper ol.w-css-reset{box-sizing:inherit;box-shadow:none;color:inherit;display:block;float:none;font:inherit;font-family:inherit;font-style:normal;font-weight:normal;font-size:inherit;letter-spacing:0;line-height:inherit;margin:0;max-height:none;max-width:none;min-height:0;min-width:0;padding:0;position:static;text-decoration:none;text-transform:none;text-shadow:none;transition:none;word-wrap:normal;-webkit-tap-highlight-color:rgba(0,0,0,0);-webkit-user-select:none;-webkit-font-smoothing:antialiased;list-style-type:none} #wistia_chrome_302 #wistia_grid_308_wrapper li.w-css-reset{box-sizing:inherit;box-shadow:none;color:inherit;display:block;float:none;font:inherit;font-family:inherit;font-style:normal;font-weight:normal;font-size:inherit;letter-spacing:0;line-height:inherit;margin:0;max-height:none;max-width:none;min-height:0;min-width:0;padding:0;position:static;text-decoration:none;text-transform:none;text-shadow:none;transition:none;word-wrap:normal;-webkit-tap-highlight-color:rgba(0,0,0,0);-webkit-user-select:none;-webkit-font-smoothing:antialiased;list-style-type:none} #wistia_chrome_302 #wistia_grid_308_wrapper ul:before.w-css-reset{display:none} #wistia_chrome_302 #wistia_grid_308_wrapper ol:before.w-css-reset{display:none} #wistia_chrome_302 #wistia_grid_308_wrapper li:before.w-css-reset{display:none} #wistia_chrome_302 #wistia_grid_308_wrapper ul:after.w-css-reset{display:none} #wistia_chrome_302 #wistia_grid_308_wrapper ol:after.w-css-reset{display:none} #wistia_chrome_302 #wistia_grid_308_wrapper li:after.w-css-reset{display:none} #wistia_chrome_302 #wistia_grid_308_wrapper label.w-css-reset{background-attachment:scroll;background-color:transparent;background-image:none;background-position:0 0;background-repeat:no-repeat;background-size:100% 100%;float:none;outline:none} #wistia_chrome_302 #wistia_grid_308_wrapper button.w-css-reset{background-attachment:scroll;background-color:transparent;background-image:none;background-position:0 0;background-repeat:no-repeat;background-size:100% 100%;border:0;border-radius:0;outline:none;position:static} #wistia_chrome_302 #wistia_grid_308_wrapper img.w-css-reset{border:0;display:inline-block;vertical-align:top;border-radius:0;outline:none;position:static} #wistia_chrome_302 #wistia_grid_308_wrapper .w-css-reset button::-moz-focus-inner{border: 0;} #wistia_chrome_302 #wistia_grid_308_wrapper .w-css-reset-tree {font-size:14px;} #wistia_chrome_302 #wistia_grid_308_wrapper .w-css-reset-tree div{box-sizing:inherit;box-shadow:none;color:inherit;display:block;float:none;font:inherit;font-family:inherit;font-style:normal;font-weight:normal;font-size:inherit;letter-spacing:0;line-height:inherit;margin:0;max-height:none;max-width:none;min-height:0;min-width:0;padding:0;position:static;text-decoration:none;text-transform:none;text-shadow:none;transition:none;word-wrap:normal;-webkit-tap-highlight-color:rgba(0,0,0,0);-webkit-user-select:none;-webkit-font-smoothing:antialiased} #wistia_chrome_302 #wistia_grid_308_wrapper .w-css-reset-tree span{box-sizing:inherit;box-shadow:none;color:inherit;display:block;float:none;font:inherit;font-family:inherit;font-style:normal;font-weight:normal;font-size:inherit;letter-spacing:0;line-height:inherit;margin:0;max-height:none;max-width:none;min-height:0;min-width:0;padding:0;position:static;text-decoration:none;text-transform:none;text-shadow:none;transition:none;word-wrap:normal;-webkit-tap-highlight-color:rgba(0,0,0,0);-webkit-user-select:none;-webkit-font-smoothing:antialiased} #wistia_chrome_302 #wistia_grid_308_wrapper .w-css-reset-tree ul{box-sizing:inherit;box-shadow:none;color:inherit;display:block;float:none;font:inherit;font-family:inherit;font-style:normal;font-weight:normal;font-size:inherit;letter-spacing:0;line-height:inherit;margin:0;max-height:none;max-width:none;min-height:0;min-width:0;padding:0;position:static;text-decoration:none;text-transform:none;text-shadow:none;transition:none;word-wrap:normal;-webkit-tap-highlight-color:rgba(0,0,0,0);-webkit-user-select:none;-webkit-font-smoothing:antialiased} #wistia_chrome_302 #wistia_grid_308_wrapper .w-css-reset-tree li{box-sizing:inherit;box-shadow:none;color:inherit;display:block;float:none;font:inherit;font-family:inherit;font-style:normal;font-weight:normal;font-size:inherit;letter-spacing:0;line-height:inherit;margin:0;max-height:none;max-width:none;min-height:0;min-width:0;padding:0;position:static;text-decoration:none;text-transform:none;text-shadow:none;transition:none;word-wrap:normal;-webkit-tap-highlight-color:rgba(0,0,0,0);-webkit-user-select:none;-webkit-font-smoothing:antialiased} #wistia_chrome_302 #wistia_grid_308_wrapper .w-css-reset-tree label{box-sizing:inherit;box-shadow:none;color:inherit;display:block;float:none;font:inherit;font-family:inherit;font-style:normal;font-weight:normal;font-size:inherit;letter-spacing:0;line-height:inherit;margin:0;max-height:none;max-width:none;min-height:0;min-width:0;padding:0;position:static;text-decoration:none;text-transform:none;text-shadow:none;transition:none;word-wrap:normal;-webkit-tap-highlight-color:rgba(0,0,0,0);-webkit-user-select:none;-webkit-font-smoothing:antialiased} #wistia_chrome_302 #wistia_grid_308_wrapper .w-css-reset-tree fieldset{box-sizing:inherit;box-shadow:none;color:inherit;display:block;float:none;font:inherit;font-family:inherit;font-style:normal;font-weight:normal;font-size:inherit;letter-spacing:0;line-height:inherit;margin:0;max-height:none;max-width:none;min-height:0;min-width:0;padding:0;position:static;text-decoration:none;text-transform:none;text-shadow:none;transition:none;word-wrap:normal;-webkit-tap-highlight-color:rgba(0,0,0,0);-webkit-user-select:none;-webkit-font-smoothing:antialiased} #wistia_chrome_302 #wistia_grid_308_wrapper .w-css-reset-tree button{box-sizing:inherit;box-shadow:none;color:inherit;display:block;float:none;font:inherit;font-family:inherit;font-style:normal;font-weight:normal;font-size:inherit;letter-spacing:0;line-height:inherit;margin:0;max-height:none;max-width:none;min-height:0;min-width:0;padding:0;position:static;text-decoration:none;text-transform:none;text-shadow:none;transition:none;word-wrap:normal;-webkit-tap-highlight-color:rgba(0,0,0,0);-webkit-user-select:none;-webkit-font-smoothing:antialiased} #wistia_chrome_302 #wistia_grid_308_wrapper .w-css-reset-tree img{box-sizing:inherit;box-shadow:none;color:inherit;display:block;float:none;font:inherit;font-family:inherit;font-style:normal;font-weight:normal;font-size:inherit;letter-spacing:0;line-height:inherit;margin:0;max-height:none;max-width:none;min-height:0;min-width:0;padding:0;position:static;text-decoration:none;text-transform:none;text-shadow:none;transition:none;word-wrap:normal;-webkit-tap-highlight-color:rgba(0,0,0,0);-webkit-user-select:none;-webkit-font-smoothing:antialiased} #wistia_chrome_302 #wistia_grid_308_wrapper .w-css-reset-tree a{box-sizing:inherit;box-shadow:none;color:inherit;display:block;float:none;font:inherit;font-family:inherit;font-style:normal;font-weight:normal;font-size:inherit;letter-spacing:0;line-height:inherit;margin:0;max-height:none;max-width:none;min-height:0;min-width:0;padding:0;position:static;text-decoration:none;text-transform:none;text-shadow:none;transition:none;word-wrap:normal;-webkit-tap-highlight-color:rgba(0,0,0,0);-webkit-user-select:none;-webkit-font-smoothing:antialiased} #wistia_chrome_302 #wistia_grid_308_wrapper .w-css-reset-tree svg{box-sizing:inherit;box-shadow:none;color:inherit;display:block;float:none;font:inherit;font-family:inherit;font-style:normal;font-weight:normal;font-size:inherit;letter-spacing:0;line-height:inherit;margin:0;max-height:none;max-width:none;min-height:0;min-width:0;padding:0;position:static;text-decoration:none;text-transform:none;text-shadow:none;transition:none;word-wrap:normal;-webkit-tap-highlight-color:rgba(0,0,0,0);-webkit-user-select:none;-webkit-font-smoothing:antialiased} #wistia_chrome_302 #wistia_grid_308_wrapper .w-css-reset-tree p{box-sizing:inherit;box-shadow:none;color:inherit;display:block;float:none;font:inherit;font-family:inherit;font-style:normal;font-weight:normal;font-size:inherit;letter-spacing:0;line-height:inherit;margin:0;max-height:none;max-width:none;min-height:0;min-width:0;padding:0;position:static;text-decoration:none;text-transform:none;text-shadow:none;transition:none;word-wrap:normal;-webkit-tap-highlight-color:rgba(0,0,0,0);-webkit-user-select:none;-webkit-font-smoothing:antialiased} #wistia_chrome_302 #wistia_grid_308_wrapper .w-css-reset-tree a{border:0;} #wistia_chrome_302 #wistia_grid_308_wrapper .w-css-reset-tree h1{box-sizing:inherit;box-shadow:none;color:inherit;display:block;float:none;font:inherit;font-family:inherit;font-style:normal;font-weight:normal;font-size:2em;letter-spacing:0;line-height:inherit;margin:0;max-height:none;max-width:none;min-height:0;min-width:0;padding:0;position:static;text-decoration:none;text-transform:none;text-shadow:none;transition:none;word-wrap:normal;-webkit-tap-highlight-color:rgba(0,0,0,0);-webkit-user-select:none;-webkit-font-smoothing:antialiased} #wistia_chrome_302 #wistia_grid_308_wrapper .w-css-reset-tree h2{box-sizing:inherit;box-shadow:none;color:inherit;display:block;float:none;font:inherit;font-family:inherit;font-style:normal;font-weight:normal;font-size:1.5em;letter-spacing:0;line-height:inherit;margin:0;max-height:none;max-width:none;min-height:0;min-width:0;padding:0;position:static;text-decoration:none;text-transform:none;text-shadow:none;transition:none;word-wrap:normal;-webkit-tap-highlight-color:rgba(0,0,0,0);-webkit-user-select:none;-webkit-font-smoothing:antialiased} #wistia_chrome_302 #wistia_grid_308_wrapper .w-css-reset-tree h3{box-sizing:inherit;box-shadow:none;color:inherit;display:block;float:none;font:inherit;font-family:inherit;font-style:normal;font-weight:normal;font-size:1.17em;letter-spacing:0;line-height:inherit;margin:0;max-height:none;max-width:none;min-height:0;min-width:0;padding:0;position:static;text-decoration:none;text-transform:none;text-shadow:none;transition:none;word-wrap:normal;-webkit-tap-highlight-color:rgba(0,0,0,0);-webkit-user-select:none;-webkit-font-smoothing:antialiased} #wistia_chrome_302 #wistia_grid_308_wrapper .w-css-reset-tree p{margin:1.4em 0;} #wistia_chrome_302 #wistia_grid_308_wrapper .w-css-reset-tree a{display:inline;} #wistia_chrome_302 #wistia_grid_308_wrapper .w-css-reset-tree span{display:inline;} #wistia_chrome_302 #wistia_grid_308_wrapper .w-css-reset-tree svg{display:inline;} #wistia_chrome_302 #wistia_grid_308_wrapper .w-css-reset-tree ul{box-sizing:inherit;box-shadow:none;color:inherit;display:block;float:none;font:inherit;font-family:inherit;font-style:normal;font-weight:normal;font-size:inherit;letter-spacing:0;line-height:inherit;margin:0;max-height:none;max-width:none;min-height:0;min-width:0;padding:0;position:static;text-decoration:none;text-transform:none;text-shadow:none;transition:none;word-wrap:normal;-webkit-tap-highlight-color:rgba(0,0,0,0);-webkit-user-select:none;-webkit-font-smoothing:antialiased;list-style-type:none} #wistia_chrome_302 #wistia_grid_308_wrapper .w-css-reset-tree ol{box-sizing:inherit;box-shadow:none;color:inherit;display:block;float:none;font:inherit;font-family:inherit;font-style:normal;font-weight:normal;font-size:inherit;letter-spacing:0;line-height:inherit;margin:0;max-height:none;max-width:none;min-height:0;min-width:0;padding:0;position:static;text-decoration:none;text-transform:none;text-shadow:none;transition:none;word-wrap:normal;-webkit-tap-highlight-color:rgba(0,0,0,0);-webkit-user-select:none;-webkit-font-smoothing:antialiased;list-style-type:none} #wistia_chrome_302 #wistia_grid_308_wrapper .w-css-reset-tree li{box-sizing:inherit;box-shadow:none;color:inherit;display:block;float:none;font:inherit;font-family:inherit;font-style:normal;font-weight:normal;font-size:inherit;letter-spacing:0;line-height:inherit;margin:0;max-height:none;max-width:none;min-height:0;min-width:0;padding:0;position:static;text-decoration:none;text-transform:none;text-shadow:none;transition:none;word-wrap:normal;-webkit-tap-highlight-color:rgba(0,0,0,0);-webkit-user-select:none;-webkit-font-smoothing:antialiased;list-style-type:none} #wistia_chrome_302 #wistia_grid_308_wrapper .w-css-reset-tree ul:before{display:none} #wistia_chrome_302 #wistia_grid_308_wrapper .w-css-reset-tree ol:before{display:none} #wistia_chrome_302 #wistia_grid_308_wrapper .w-css-reset-tree li:before{display:none} #wistia_chrome_302 #wistia_grid_308_wrapper .w-css-reset-tree ul:after{display:none} #wistia_chrome_302 #wistia_grid_308_wrapper .w-css-reset-tree ol:after{display:none} #wistia_chrome_302 #wistia_grid_308_wrapper .w-css-reset-tree li:after{display:none} #wistia_chrome_302 #wistia_grid_308_wrapper .w-css-reset-tree label{background-attachment:scroll;background-color:transparent;background-image:none;background-position:0 0;background-repeat:no-repeat;background-size:100% 100%;float:none;outline:none} #wistia_chrome_302 #wistia_grid_308_wrapper .w-css-reset-tree button{background-attachment:scroll;background-color:transparent;background-image:none;background-position:0 0;background-repeat:no-repeat;background-size:100% 100%;border:0;border-radius:0;outline:none;position:static} #wistia_chrome_302 #wistia_grid_308_wrapper .w-css-reset-tree img{border:0;display:inline-block;vertical-align:top;border-radius:0;outline:none;position:static} #wistia_chrome_302 #wistia_grid_308_wrapper .w-css-reset-tree button::-moz-focus-inner{border: 0;} #wistia_chrome_302 #wistia_grid_308_wrapper .w-css-reset-max-width-none-important{max-width:none!important} #wistia_chrome_302 #wistia_grid_308_wrapper .w-css-reset-button-important{border-radius:0!important;color:#fff!important;}
#wistia_grid_308_wrapper{-moz-box-sizing:content-box;-webkit-box-sizing:content-box;box-sizing:content-box;font-family:Arial,sans-serif;font-size:14px;height:100%;position:relative;text-align:left;width:100%;} #wistia_grid_308_wrapper *{-moz-box-sizing:content-box;-webkit-box-sizing:content-box;box-sizing:content-box;} #wistia_grid_308_above{position:relative;} #wistia_grid_308_main{display:block;height:100%;position:relative;} #wistia_grid_308_behind{height:100%;left:0;position:absolute;top:0;width:100%;} #wistia_grid_308_center{height:100%;overflow:hidden;position:relative;width:100%;} #wistia_grid_308_front{display:none;height:100%;left:0;position:absolute;top:0;width:100%;} #wistia_grid_308_top_inside{position:absolute;left:0;top:0;width:100%;} #wistia_grid_308_top{width:100%;position:absolute;bottom:0;left:0;} #wistia_grid_308_bottom_inside{position:absolute;left:0;bottom:0;width:100%;} #wistia_grid_308_bottom{width:100%;position:absolute;top:0;left:0;} #wistia_grid_308_left_inside{height:100%;position:absolute;left:0;top:0;} #wistia_grid_308_left{height:100%;position:absolute;right:0;top:0;} #wistia_grid_308_right_inside{height:100%;right:0;position:absolute;top:0;} #wistia_grid_308_right{height:100%;left:0;position:absolute;top:0;} #wistia_grid_308_below{position:relative;}
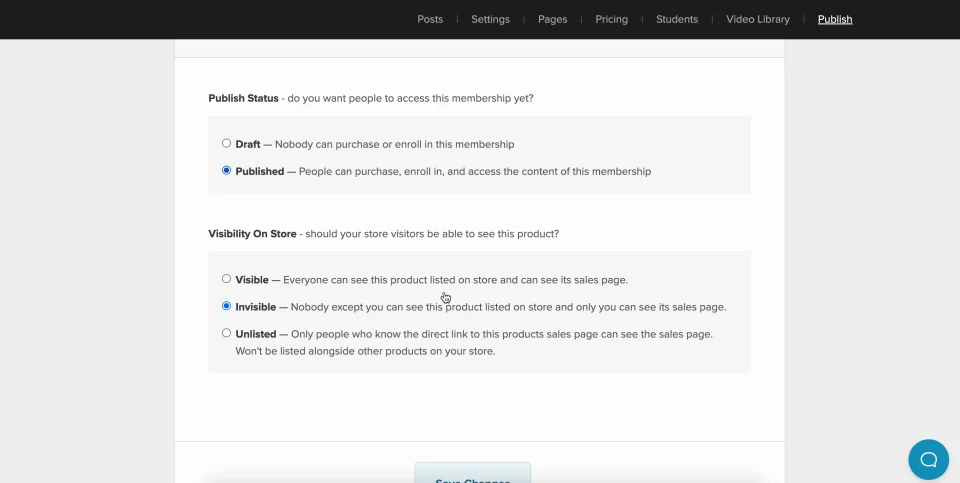
Publishing Your Membership
If you're ready to publish your membership, click on the Publish tab shown on the top black bar of your manage membership product page.
Next you'll see a number of publishing options:
Click on the right option for you then save your changes.
Click for sound
@keyframes VOLUME_SMALL_WAVE_FLASH { 0% { opacity: 0; } 33% { opacity: 1; } 66% { opacity: 1; } 100% { opacity: 0; } } @keyframes VOLUME_LARGE_WAVE_FLASH { 0% { opacity: 0; } 33% { opacity: 1; } 66% { opacity: 1; } 100% { opacity: 0; } } .volume__small-wave { animation: VOLUME_SMALL_WAVE_FLASH 2s infinite; opacity: 0; } .volume__large-wave { animation: VOLUME_LARGE_WAVE_FLASH 2s infinite .3s; opacity: 0; }
@media (prefers-reduced-motion: no-preference) { @keyframes w-control-bar-fade-in { 0% { opacity: 0; transform: translateX(50%) translateY(10px); } 100% { opacity: 1; transform: translateX(50%) translateY(0px); } } }
#wistia_chrome_329 #wistia_grid_335_wrapper .w-css-reset{font-size:14px;} #wistia_chrome_329 #wistia_grid_335_wrapper div.w-css-reset{box-sizing:inherit;box-shadow:none;color:inherit;display:block;float:none;font:inherit;font-family:inherit;font-style:normal;font-weight:normal;font-size:inherit;letter-spacing:0;line-height:inherit;margin:0;max-height:none;max-width:none;min-height:0;min-width:0;padding:0;position:static;text-decoration:none;text-transform:none;text-shadow:none;transition:none;word-wrap:normal;-webkit-tap-highlight-color:rgba(0,0,0,0);-webkit-user-select:none;-webkit-font-smoothing:antialiased} #wistia_chrome_329 #wistia_grid_335_wrapper span.w-css-reset{box-sizing:inherit;box-shadow:none;color:inherit;display:block;float:none;font:inherit;font-family:inherit;font-style:normal;font-weight:normal;font-size:inherit;letter-spacing:0;line-height:inherit;margin:0;max-height:none;max-width:none;min-height:0;min-width:0;padding:0;position:static;text-decoration:none;text-transform:none;text-shadow:none;transition:none;word-wrap:normal;-webkit-tap-highlight-color:rgba(0,0,0,0);-webkit-user-select:none;-webkit-font-smoothing:antialiased} #wistia_chrome_329 #wistia_grid_335_wrapper ul.w-css-reset{box-sizing:inherit;box-shadow:none;color:inherit;display:block;float:none;font:inherit;font-family:inherit;font-style:normal;font-weight:normal;font-size:inherit;letter-spacing:0;line-height:inherit;margin:0;max-height:none;max-width:none;min-height:0;min-width:0;padding:0;position:static;text-decoration:none;text-transform:none;text-shadow:none;transition:none;word-wrap:normal;-webkit-tap-highlight-color:rgba(0,0,0,0);-webkit-user-select:none;-webkit-font-smoothing:antialiased} #wistia_chrome_329 #wistia_grid_335_wrapper li.w-css-reset{box-sizing:inherit;box-shadow:none;color:inherit;display:block;float:none;font:inherit;font-family:inherit;font-style:normal;font-weight:normal;font-size:inherit;letter-spacing:0;line-height:inherit;margin:0;max-height:none;max-width:none;min-height:0;min-width:0;padding:0;position:static;text-decoration:none;text-transform:none;text-shadow:none;transition:none;word-wrap:normal;-webkit-tap-highlight-color:rgba(0,0,0,0);-webkit-user-select:none;-webkit-font-smoothing:antialiased} #wistia_chrome_329 #wistia_grid_335_wrapper label.w-css-reset{box-sizing:inherit;box-shadow:none;color:inherit;display:block;float:none;font:inherit;font-family:inherit;font-style:normal;font-weight:normal;font-size:inherit;letter-spacing:0;line-height:inherit;margin:0;max-height:none;max-width:none;min-height:0;min-width:0;padding:0;position:static;text-decoration:none;text-transform:none;text-shadow:none;transition:none;word-wrap:normal;-webkit-tap-highlight-color:rgba(0,0,0,0);-webkit-user-select:none;-webkit-font-smoothing:antialiased} #wistia_chrome_329 #wistia_grid_335_wrapper fieldset.w-css-reset{box-sizing:inherit;box-shadow:none;color:inherit;display:block;float:none;font:inherit;font-family:inherit;font-style:normal;font-weight:normal;font-size:inherit;letter-spacing:0;line-height:inherit;margin:0;max-height:none;max-width:none;min-height:0;min-width:0;padding:0;position:static;text-decoration:none;text-transform:none;text-shadow:none;transition:none;word-wrap:normal;-webkit-tap-highlight-color:rgba(0,0,0,0);-webkit-user-select:none;-webkit-font-smoothing:antialiased} #wistia_chrome_329 #wistia_grid_335_wrapper button.w-css-reset{box-sizing:inherit;box-shadow:none;color:inherit;display:block;float:none;font:inherit;font-family:inherit;font-style:normal;font-weight:normal;font-size:inherit;letter-spacing:0;line-height:inherit;margin:0;max-height:none;max-width:none;min-height:0;min-width:0;padding:0;position:static;text-decoration:none;text-transform:none;text-shadow:none;transition:none;word-wrap:normal;-webkit-tap-highlight-color:rgba(0,0,0,0);-webkit-user-select:none;-webkit-font-smoothing:antialiased} #wistia_chrome_329 #wistia_grid_335_wrapper img.w-css-reset{box-sizing:inherit;box-shadow:none;color:inherit;display:block;float:none;font:inherit;font-family:inherit;font-style:normal;font-weight:normal;font-size:inherit;letter-spacing:0;line-height:inherit;margin:0;max-height:none;max-width:none;min-height:0;min-width:0;padding:0;position:static;text-decoration:none;text-transform:none;text-shadow:none;transition:none;word-wrap:normal;-webkit-tap-highlight-color:rgba(0,0,0,0);-webkit-user-select:none;-webkit-font-smoothing:antialiased} #wistia_chrome_329 #wistia_grid_335_wrapper a.w-css-reset{box-sizing:inherit;box-shadow:none;color:inherit;display:block;float:none;font:inherit;font-family:inherit;font-style:normal;font-weight:normal;font-size:inherit;letter-spacing:0;line-height:inherit;margin:0;max-height:none;max-width:none;min-height:0;min-width:0;padding:0;position:static;text-decoration:none;text-transform:none;text-shadow:none;transition:none;word-wrap:normal;-webkit-tap-highlight-color:rgba(0,0,0,0);-webkit-user-select:none;-webkit-font-smoothing:antialiased} #wistia_chrome_329 #wistia_grid_335_wrapper svg.w-css-reset{box-sizing:inherit;box-shadow:none;color:inherit;display:block;float:none;font:inherit;font-family:inherit;font-style:normal;font-weight:normal;font-size:inherit;letter-spacing:0;line-height:inherit;margin:0;max-height:none;max-width:none;min-height:0;min-width:0;padding:0;position:static;text-decoration:none;text-transform:none;text-shadow:none;transition:none;word-wrap:normal;-webkit-tap-highlight-color:rgba(0,0,0,0);-webkit-user-select:none;-webkit-font-smoothing:antialiased} #wistia_chrome_329 #wistia_grid_335_wrapper p.w-css-reset{box-sizing:inherit;box-shadow:none;color:inherit;display:block;float:none;font:inherit;font-family:inherit;font-style:normal;font-weight:normal;font-size:inherit;letter-spacing:0;line-height:inherit;margin:0;max-height:none;max-width:none;min-height:0;min-width:0;padding:0;position:static;text-decoration:none;text-transform:none;text-shadow:none;transition:none;word-wrap:normal;-webkit-tap-highlight-color:rgba(0,0,0,0);-webkit-user-select:none;-webkit-font-smoothing:antialiased} #wistia_chrome_329 #wistia_grid_335_wrapper a.w-css-reset{border:0;} #wistia_chrome_329 #wistia_grid_335_wrapper h1.w-css-reset{box-sizing:inherit;box-shadow:none;color:inherit;display:block;float:none;font:inherit;font-family:inherit;font-style:normal;font-weight:normal;font-size:2em;letter-spacing:0;line-height:inherit;margin:0;max-height:none;max-width:none;min-height:0;min-width:0;padding:0;position:static;text-decoration:none;text-transform:none;text-shadow:none;transition:none;word-wrap:normal;-webkit-tap-highlight-color:rgba(0,0,0,0);-webkit-user-select:none;-webkit-font-smoothing:antialiased} #wistia_chrome_329 #wistia_grid_335_wrapper h2.w-css-reset{box-sizing:inherit;box-shadow:none;color:inherit;display:block;float:none;font:inherit;font-family:inherit;font-style:normal;font-weight:normal;font-size:1.5em;letter-spacing:0;line-height:inherit;margin:0;max-height:none;max-width:none;min-height:0;min-width:0;padding:0;position:static;text-decoration:none;text-transform:none;text-shadow:none;transition:none;word-wrap:normal;-webkit-tap-highlight-color:rgba(0,0,0,0);-webkit-user-select:none;-webkit-font-smoothing:antialiased} #wistia_chrome_329 #wistia_grid_335_wrapper h3.w-css-reset{box-sizing:inherit;box-shadow:none;color:inherit;display:block;float:none;font:inherit;font-family:inherit;font-style:normal;font-weight:normal;font-size:1.17em;letter-spacing:0;line-height:inherit;margin:0;max-height:none;max-width:none;min-height:0;min-width:0;padding:0;position:static;text-decoration:none;text-transform:none;text-shadow:none;transition:none;word-wrap:normal;-webkit-tap-highlight-color:rgba(0,0,0,0);-webkit-user-select:none;-webkit-font-smoothing:antialiased} #wistia_chrome_329 #wistia_grid_335_wrapper p.w-css-reset{margin:1.4em 0;} #wistia_chrome_329 #wistia_grid_335_wrapper a.w-css-reset{display:inline;} #wistia_chrome_329 #wistia_grid_335_wrapper span.w-css-reset{display:inline;} #wistia_chrome_329 #wistia_grid_335_wrapper svg.w-css-reset{display:inline;} #wistia_chrome_329 #wistia_grid_335_wrapper ul.w-css-reset{box-sizing:inherit;box-shadow:none;color:inherit;display:block;float:none;font:inherit;font-family:inherit;font-style:normal;font-weight:normal;font-size:inherit;letter-spacing:0;line-height:inherit;margin:0;max-height:none;max-width:none;min-height:0;min-width:0;padding:0;position:static;text-decoration:none;text-transform:none;text-shadow:none;transition:none;word-wrap:normal;-webkit-tap-highlight-color:rgba(0,0,0,0);-webkit-user-select:none;-webkit-font-smoothing:antialiased;list-style-type:none} #wistia_chrome_329 #wistia_grid_335_wrapper ol.w-css-reset{box-sizing:inherit;box-shadow:none;color:inherit;display:block;float:none;font:inherit;font-family:inherit;font-style:normal;font-weight:normal;font-size:inherit;letter-spacing:0;line-height:inherit;margin:0;max-height:none;max-width:none;min-height:0;min-width:0;padding:0;position:static;text-decoration:none;text-transform:none;text-shadow:none;transition:none;word-wrap:normal;-webkit-tap-highlight-color:rgba(0,0,0,0);-webkit-user-select:none;-webkit-font-smoothing:antialiased;list-style-type:none} #wistia_chrome_329 #wistia_grid_335_wrapper li.w-css-reset{box-sizing:inherit;box-shadow:none;color:inherit;display:block;float:none;font:inherit;font-family:inherit;font-style:normal;font-weight:normal;font-size:inherit;letter-spacing:0;line-height:inherit;margin:0;max-height:none;max-width:none;min-height:0;min-width:0;padding:0;position:static;text-decoration:none;text-transform:none;text-shadow:none;transition:none;word-wrap:normal;-webkit-tap-highlight-color:rgba(0,0,0,0);-webkit-user-select:none;-webkit-font-smoothing:antialiased;list-style-type:none} #wistia_chrome_329 #wistia_grid_335_wrapper ul:before.w-css-reset{display:none} #wistia_chrome_329 #wistia_grid_335_wrapper ol:before.w-css-reset{display:none} #wistia_chrome_329 #wistia_grid_335_wrapper li:before.w-css-reset{display:none} #wistia_chrome_329 #wistia_grid_335_wrapper ul:after.w-css-reset{display:none} #wistia_chrome_329 #wistia_grid_335_wrapper ol:after.w-css-reset{display:none} #wistia_chrome_329 #wistia_grid_335_wrapper li:after.w-css-reset{display:none} #wistia_chrome_329 #wistia_grid_335_wrapper label.w-css-reset{background-attachment:scroll;background-color:transparent;background-image:none;background-position:0 0;background-repeat:no-repeat;background-size:100% 100%;float:none;outline:none} #wistia_chrome_329 #wistia_grid_335_wrapper button.w-css-reset{background-attachment:scroll;background-color:transparent;background-image:none;background-position:0 0;background-repeat:no-repeat;background-size:100% 100%;border:0;border-radius:0;outline:none;position:static} #wistia_chrome_329 #wistia_grid_335_wrapper img.w-css-reset{border:0;display:inline-block;vertical-align:top;border-radius:0;outline:none;position:static} #wistia_chrome_329 #wistia_grid_335_wrapper .w-css-reset button::-moz-focus-inner{border: 0;} #wistia_chrome_329 #wistia_grid_335_wrapper .w-css-reset-tree {font-size:14px;} #wistia_chrome_329 #wistia_grid_335_wrapper .w-css-reset-tree div{box-sizing:inherit;box-shadow:none;color:inherit;display:block;float:none;font:inherit;font-family:inherit;font-style:normal;font-weight:normal;font-size:inherit;letter-spacing:0;line-height:inherit;margin:0;max-height:none;max-width:none;min-height:0;min-width:0;padding:0;position:static;text-decoration:none;text-transform:none;text-shadow:none;transition:none;word-wrap:normal;-webkit-tap-highlight-color:rgba(0,0,0,0);-webkit-user-select:none;-webkit-font-smoothing:antialiased} #wistia_chrome_329 #wistia_grid_335_wrapper .w-css-reset-tree span{box-sizing:inherit;box-shadow:none;color:inherit;display:block;float:none;font:inherit;font-family:inherit;font-style:normal;font-weight:normal;font-size:inherit;letter-spacing:0;line-height:inherit;margin:0;max-height:none;max-width:none;min-height:0;min-width:0;padding:0;position:static;text-decoration:none;text-transform:none;text-shadow:none;transition:none;word-wrap:normal;-webkit-tap-highlight-color:rgba(0,0,0,0);-webkit-user-select:none;-webkit-font-smoothing:antialiased} #wistia_chrome_329 #wistia_grid_335_wrapper .w-css-reset-tree ul{box-sizing:inherit;box-shadow:none;color:inherit;display:block;float:none;font:inherit;font-family:inherit;font-style:normal;font-weight:normal;font-size:inherit;letter-spacing:0;line-height:inherit;margin:0;max-height:none;max-width:none;min-height:0;min-width:0;padding:0;position:static;text-decoration:none;text-transform:none;text-shadow:none;transition:none;word-wrap:normal;-webkit-tap-highlight-color:rgba(0,0,0,0);-webkit-user-select:none;-webkit-font-smoothing:antialiased} #wistia_chrome_329 #wistia_grid_335_wrapper .w-css-reset-tree li{box-sizing:inherit;box-shadow:none;color:inherit;display:block;float:none;font:inherit;font-family:inherit;font-style:normal;font-weight:normal;font-size:inherit;letter-spacing:0;line-height:inherit;margin:0;max-height:none;max-width:none;min-height:0;min-width:0;padding:0;position:static;text-decoration:none;text-transform:none;text-shadow:none;transition:none;word-wrap:normal;-webkit-tap-highlight-color:rgba(0,0,0,0);-webkit-user-select:none;-webkit-font-smoothing:antialiased} #wistia_chrome_329 #wistia_grid_335_wrapper .w-css-reset-tree label{box-sizing:inherit;box-shadow:none;color:inherit;display:block;float:none;font:inherit;font-family:inherit;font-style:normal;font-weight:normal;font-size:inherit;letter-spacing:0;line-height:inherit;margin:0;max-height:none;max-width:none;min-height:0;min-width:0;padding:0;position:static;text-decoration:none;text-transform:none;text-shadow:none;transition:none;word-wrap:normal;-webkit-tap-highlight-color:rgba(0,0,0,0);-webkit-user-select:none;-webkit-font-smoothing:antialiased} #wistia_chrome_329 #wistia_grid_335_wrapper .w-css-reset-tree fieldset{box-sizing:inherit;box-shadow:none;color:inherit;display:block;float:none;font:inherit;font-family:inherit;font-style:normal;font-weight:normal;font-size:inherit;letter-spacing:0;line-height:inherit;margin:0;max-height:none;max-width:none;min-height:0;min-width:0;padding:0;position:static;text-decoration:none;text-transform:none;text-shadow:none;transition:none;word-wrap:normal;-webkit-tap-highlight-color:rgba(0,0,0,0);-webkit-user-select:none;-webkit-font-smoothing:antialiased} #wistia_chrome_329 #wistia_grid_335_wrapper .w-css-reset-tree button{box-sizing:inherit;box-shadow:none;color:inherit;display:block;float:none;font:inherit;font-family:inherit;font-style:normal;font-weight:normal;font-size:inherit;letter-spacing:0;line-height:inherit;margin:0;max-height:none;max-width:none;min-height:0;min-width:0;padding:0;position:static;text-decoration:none;text-transform:none;text-shadow:none;transition:none;word-wrap:normal;-webkit-tap-highlight-color:rgba(0,0,0,0);-webkit-user-select:none;-webkit-font-smoothing:antialiased} #wistia_chrome_329 #wistia_grid_335_wrapper .w-css-reset-tree img{box-sizing:inherit;box-shadow:none;color:inherit;display:block;float:none;font:inherit;font-family:inherit;font-style:normal;font-weight:normal;font-size:inherit;letter-spacing:0;line-height:inherit;margin:0;max-height:none;max-width:none;min-height:0;min-width:0;padding:0;position:static;text-decoration:none;text-transform:none;text-shadow:none;transition:none;word-wrap:normal;-webkit-tap-highlight-color:rgba(0,0,0,0);-webkit-user-select:none;-webkit-font-smoothing:antialiased} #wistia_chrome_329 #wistia_grid_335_wrapper .w-css-reset-tree a{box-sizing:inherit;box-shadow:none;color:inherit;display:block;float:none;font:inherit;font-family:inherit;font-style:normal;font-weight:normal;font-size:inherit;letter-spacing:0;line-height:inherit;margin:0;max-height:none;max-width:none;min-height:0;min-width:0;padding:0;position:static;text-decoration:none;text-transform:none;text-shadow:none;transition:none;word-wrap:normal;-webkit-tap-highlight-color:rgba(0,0,0,0);-webkit-user-select:none;-webkit-font-smoothing:antialiased} #wistia_chrome_329 #wistia_grid_335_wrapper .w-css-reset-tree svg{box-sizing:inherit;box-shadow:none;color:inherit;display:block;float:none;font:inherit;font-family:inherit;font-style:normal;font-weight:normal;font-size:inherit;letter-spacing:0;line-height:inherit;margin:0;max-height:none;max-width:none;min-height:0;min-width:0;padding:0;position:static;text-decoration:none;text-transform:none;text-shadow:none;transition:none;word-wrap:normal;-webkit-tap-highlight-color:rgba(0,0,0,0);-webkit-user-select:none;-webkit-font-smoothing:antialiased} #wistia_chrome_329 #wistia_grid_335_wrapper .w-css-reset-tree p{box-sizing:inherit;box-shadow:none;color:inherit;display:block;float:none;font:inherit;font-family:inherit;font-style:normal;font-weight:normal;font-size:inherit;letter-spacing:0;line-height:inherit;margin:0;max-height:none;max-width:none;min-height:0;min-width:0;padding:0;position:static;text-decoration:none;text-transform:none;text-shadow:none;transition:none;word-wrap:normal;-webkit-tap-highlight-color:rgba(0,0,0,0);-webkit-user-select:none;-webkit-font-smoothing:antialiased} #wistia_chrome_329 #wistia_grid_335_wrapper .w-css-reset-tree a{border:0;} #wistia_chrome_329 #wistia_grid_335_wrapper .w-css-reset-tree h1{box-sizing:inherit;box-shadow:none;color:inherit;display:block;float:none;font:inherit;font-family:inherit;font-style:normal;font-weight:normal;font-size:2em;letter-spacing:0;line-height:inherit;margin:0;max-height:none;max-width:none;min-height:0;min-width:0;padding:0;position:static;text-decoration:none;text-transform:none;text-shadow:none;transition:none;word-wrap:normal;-webkit-tap-highlight-color:rgba(0,0,0,0);-webkit-user-select:none;-webkit-font-smoothing:antialiased} #wistia_chrome_329 #wistia_grid_335_wrapper .w-css-reset-tree h2{box-sizing:inherit;box-shadow:none;color:inherit;display:block;float:none;font:inherit;font-family:inherit;font-style:normal;font-weight:normal;font-size:1.5em;letter-spacing:0;line-height:inherit;margin:0;max-height:none;max-width:none;min-height:0;min-width:0;padding:0;position:static;text-decoration:none;text-transform:none;text-shadow:none;transition:none;word-wrap:normal;-webkit-tap-highlight-color:rgba(0,0,0,0);-webkit-user-select:none;-webkit-font-smoothing:antialiased} #wistia_chrome_329 #wistia_grid_335_wrapper .w-css-reset-tree h3{box-sizing:inherit;box-shadow:none;color:inherit;display:block;float:none;font:inherit;font-family:inherit;font-style:normal;font-weight:normal;font-size:1.17em;letter-spacing:0;line-height:inherit;margin:0;max-height:none;max-width:none;min-height:0;min-width:0;padding:0;position:static;text-decoration:none;text-transform:none;text-shadow:none;transition:none;word-wrap:normal;-webkit-tap-highlight-color:rgba(0,0,0,0);-webkit-user-select:none;-webkit-font-smoothing:antialiased} #wistia_chrome_329 #wistia_grid_335_wrapper .w-css-reset-tree p{margin:1.4em 0;} #wistia_chrome_329 #wistia_grid_335_wrapper .w-css-reset-tree a{display:inline;} #wistia_chrome_329 #wistia_grid_335_wrapper .w-css-reset-tree span{display:inline;} #wistia_chrome_329 #wistia_grid_335_wrapper .w-css-reset-tree svg{display:inline;} #wistia_chrome_329 #wistia_grid_335_wrapper .w-css-reset-tree ul{box-sizing:inherit;box-shadow:none;color:inherit;display:block;float:none;font:inherit;font-family:inherit;font-style:normal;font-weight:normal;font-size:inherit;letter-spacing:0;line-height:inherit;margin:0;max-height:none;max-width:none;min-height:0;min-width:0;padding:0;position:static;text-decoration:none;text-transform:none;text-shadow:none;transition:none;word-wrap:normal;-webkit-tap-highlight-color:rgba(0,0,0,0);-webkit-user-select:none;-webkit-font-smoothing:antialiased;list-style-type:none} #wistia_chrome_329 #wistia_grid_335_wrapper .w-css-reset-tree ol{box-sizing:inherit;box-shadow:none;color:inherit;display:block;float:none;font:inherit;font-family:inherit;font-style:normal;font-weight:normal;font-size:inherit;letter-spacing:0;line-height:inherit;margin:0;max-height:none;max-width:none;min-height:0;min-width:0;padding:0;position:static;text-decoration:none;text-transform:none;text-shadow:none;transition:none;word-wrap:normal;-webkit-tap-highlight-color:rgba(0,0,0,0);-webkit-user-select:none;-webkit-font-smoothing:antialiased;list-style-type:none} #wistia_chrome_329 #wistia_grid_335_wrapper .w-css-reset-tree li{box-sizing:inherit;box-shadow:none;color:inherit;display:block;float:none;font:inherit;font-family:inherit;font-style:normal;font-weight:normal;font-size:inherit;letter-spacing:0;line-height:inherit;margin:0;max-height:none;max-width:none;min-height:0;min-width:0;padding:0;position:static;text-decoration:none;text-transform:none;text-shadow:none;transition:none;word-wrap:normal;-webkit-tap-highlight-color:rgba(0,0,0,0);-webkit-user-select:none;-webkit-font-smoothing:antialiased;list-style-type:none} #wistia_chrome_329 #wistia_grid_335_wrapper .w-css-reset-tree ul:before{display:none} #wistia_chrome_329 #wistia_grid_335_wrapper .w-css-reset-tree ol:before{display:none} #wistia_chrome_329 #wistia_grid_335_wrapper .w-css-reset-tree li:before{display:none} #wistia_chrome_329 #wistia_grid_335_wrapper .w-css-reset-tree ul:after{display:none} #wistia_chrome_329 #wistia_grid_335_wrapper .w-css-reset-tree ol:after{display:none} #wistia_chrome_329 #wistia_grid_335_wrapper .w-css-reset-tree li:after{display:none} #wistia_chrome_329 #wistia_grid_335_wrapper .w-css-reset-tree label{background-attachment:scroll;background-color:transparent;background-image:none;background-position:0 0;background-repeat:no-repeat;background-size:100% 100%;float:none;outline:none} #wistia_chrome_329 #wistia_grid_335_wrapper .w-css-reset-tree button{background-attachment:scroll;background-color:transparent;background-image:none;background-position:0 0;background-repeat:no-repeat;background-size:100% 100%;border:0;border-radius:0;outline:none;position:static} #wistia_chrome_329 #wistia_grid_335_wrapper .w-css-reset-tree img{border:0;display:inline-block;vertical-align:top;border-radius:0;outline:none;position:static} #wistia_chrome_329 #wistia_grid_335_wrapper .w-css-reset-tree button::-moz-focus-inner{border: 0;} #wistia_chrome_329 #wistia_grid_335_wrapper .w-css-reset-max-width-none-important{max-width:none!important} #wistia_chrome_329 #wistia_grid_335_wrapper .w-css-reset-button-important{border-radius:0!important;color:#fff!important;}
#wistia_grid_335_wrapper{-moz-box-sizing:content-box;-webkit-box-sizing:content-box;box-sizing:content-box;font-family:Arial,sans-serif;font-size:14px;height:100%;position:relative;text-align:left;width:100%;} #wistia_grid_335_wrapper *{-moz-box-sizing:content-box;-webkit-box-sizing:content-box;box-sizing:content-box;} #wistia_grid_335_above{position:relative;} #wistia_grid_335_main{display:block;height:100%;position:relative;} #wistia_grid_335_behind{height:100%;left:0;position:absolute;top:0;width:100%;} #wistia_grid_335_center{height:100%;overflow:hidden;position:relative;width:100%;} #wistia_grid_335_front{display:none;height:100%;left:0;position:absolute;top:0;width:100%;} #wistia_grid_335_top_inside{position:absolute;left:0;top:0;width:100%;} #wistia_grid_335_top{width:100%;position:absolute;bottom:0;left:0;} #wistia_grid_335_bottom_inside{position:absolute;left:0;bottom:0;width:100%;} #wistia_grid_335_bottom{width:100%;position:absolute;top:0;left:0;} #wistia_grid_335_left_inside{height:100%;position:absolute;left:0;top:0;} #wistia_grid_335_left{height:100%;position:absolute;right:0;top:0;} #wistia_grid_335_right_inside{height:100%;right:0;position:absolute;top:0;} #wistia_grid_335_right{height:100%;left:0;position:absolute;top:0;} #wistia_grid_335_below{position:relative;}
Editing Checkout Page
Before we dive into editing a checkout page, it's important to note that your customers won't be able to see your checkout pages while the membership is still in Draft mode.
You can customize the checkout page with your logo. For full control over the layout you can provide your own CSS to be used on the checkout page.
How do you customize the checkout page for your membership product? You'll need to be logged into your seller account, and then visit one of your checkout pages for a membership product. On the bottom right of the screen you'll notice a green gear icon. Click this icon to customize the page with your logo and custom CSS.
Editing Thank You Page
The thank-you page is the page that your members are taken to after they have successfully purchased on the checkout page.
To edit the thank-you page, visit your manage membership product page, click on the Pages link and then click on the Edit button in the thank-you page section. You'll be taken to the store builder for the thank-you page and will be able to fully customize the page with many types of sections like text, image, slideshow, video, etc...
It's important to note though, that the first thing a member will want to do when they've purchased is login to their account. So your thank-you page must show a prominent Log In button.